Best FC 26 4-4-1-1 (2) Custom Tactics | Pro Guide | EasySBC
FC Pro Cameron Rock's 4-4-1-1 (2) custom tactics explained for FC 26.
Jamo - EasySBC Content Creator · 27 Jul 2026
Best FC 26 4-4-1-1 (2) Custom Tactics
About this tactic
Looking for the best FC 26 4-4-1-1 (2) custom tactics? Cameron Rock's setup is one of the most balanced formations in the current meta, offering defensive stability without sacrificing attacking quality.
Used by the FC Pro qualified player, this tactic focuses on staying compact out of possession while creating quick attacks through intelligent movement in midfield. Rather than relying on constant pressure or risky attacking instructions, the formation rewards patience, controlled build-up and well-timed forward runs.
In this guide, we'll explain not only the custom tactics and player roles Cameron Rock uses, but also why each instruction helps the formation perform so well in FC 26 Ultimate Team.
Best For
- FUT Champions
- Division Rivals
- Possession-focused players
- Players who like attacking through the middle
May Not Suit
- Players who prefer two strikers
- Cross-heavy playstyles
- Ultra-aggressive pressing
Why Cameron Rock Uses the 4-4-1-1 (2)
The biggest strength of this formation is balance.
Instead of committing too many players forward, the 4-4-1-1 (2) keeps your midfield connected to both defence and attack. The CAM becomes the link between the lines, giving you a reliable passing option whenever you're building forward.
Defensively, the shape naturally stays compact. With two central midfielders protecting the defence and wide midfielders recovering quickly, it's difficult for opponents to play straight through the middle.
Going forward, the formation comes alive in transition. The Shadow Striker supports the Advanced Forward, while the Inside Forward and Winger stretch the pitch and create space for runners from midfield.
It's a setup that rewards smart decision-making rather than forcing attacks, making it ideal for competitive gameplay.
FC 26 Custom Tactics
Formation
4-4-1-1 (2) The CAM sits just behind the striker, creating a natural link between midfield and attack without leaving your defence exposed.
Build-Up Style
Balanced
Balanced Build-Up gives your team flexibility. Players won't force unnecessary runs, meaning you'll always have passing options while waiting for space to open.
Defensive Approach
Balanced
Rather than chasing the ball, this setup focuses on maintaining shape. Strong defensive positioning is often more effective than constant pressing, especially against skilled opponents.
Defensive Line
60
A defensive line of 60 keeps your team compact while still applying pressure higher up the pitch. Combined with a Sweeper Keeper, it helps deal with through balls without leaving huge gaps behind the defence.
Player Roles
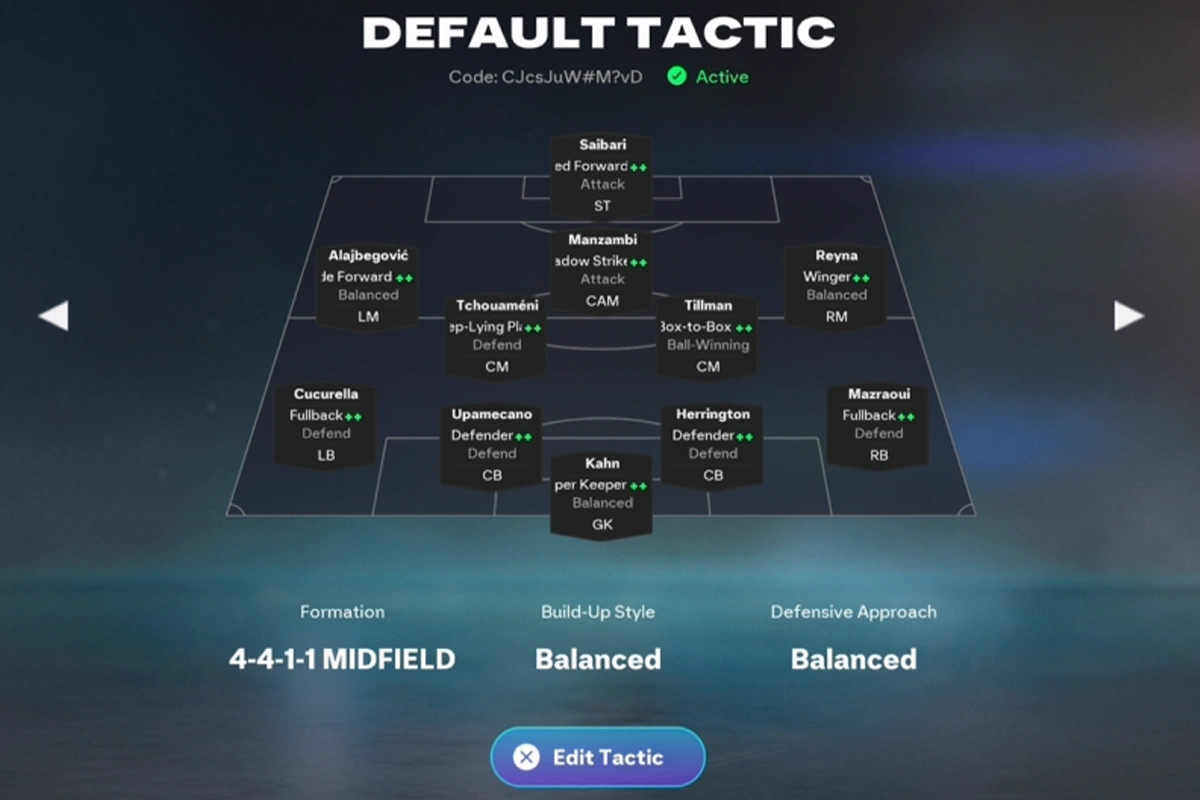
Goalkeeper – Sweeper Keeper (Balanced)
The Sweeper Keeper provides security behind the defence, helping collect through balls before attackers can reach them. This is particularly important with a slightly higher defensive line.
Fullbacks – Fullback (Defend)
Both fullbacks prioritise defensive stability. Instead of constantly overlapping, they maintain the back four and only support attacks when safe to do so, reducing the risk of being caught on the counter.
Centre-Backs – Defender (Defend)
Simple but effective. The centre-backs stay focused on protecting the penalty area, winning aerial duels and stopping direct attacks rather than stepping aggressively into midfield.
Left CM – Deep-Lying Playmaker (Defend)
This player acts as the one who dictates the tempo of the match. By sitting deeper, they provide an easy passing option during build-up while offering extra protection in front of the defence.
Right CM – Box-to-Box (Ball-Winning)
This role constantly fills the gaps left by the CAM. They'll often arrive late into attacks but still recover quickly enough to help defend counters, making them one of the busiest players in the team
Left Midfielder – Inside Forward (Balanced)
Instead of hugging the touchline, the Inside Forward attacks central spaces when opportunities arise. This creates overloads around the CAM and striker without leaving the flank completely empty.
Right Midfielder – Winger (Balanced)
The Winger keeps the pitch wide, stretching opposition defences and creating space for central players. Their positioning makes it harder for opponents to defend narrowly.
CAM – Shadow Striker (Attack)
The Shadow Striker is where most of the goals come from. If your opponent spends the game tracking your striker, the CAM often arrives late into the box completely unmarked. It's one of the reasons this setup feels so dangerous.
ST – Advanced Forward (Attack)
The Advanced Forward constantly looks to stretch the opposition defence with runs in behind. Their movement creates space for both the Shadow Striker and supporting midfielders to exploit.
How to Find the Best Players for Each Role
Choosing the right players is just as important as using the correct tactics. While these instructions work with many squads, selecting players that naturally suit each role will help you get the most out of the formation.
Use the EasySBC Player Database to compare players by role, playstyles and attributes before building your squad.
Browse the best players for every role in the EasySBC Player Database.
How This Formation Attacks
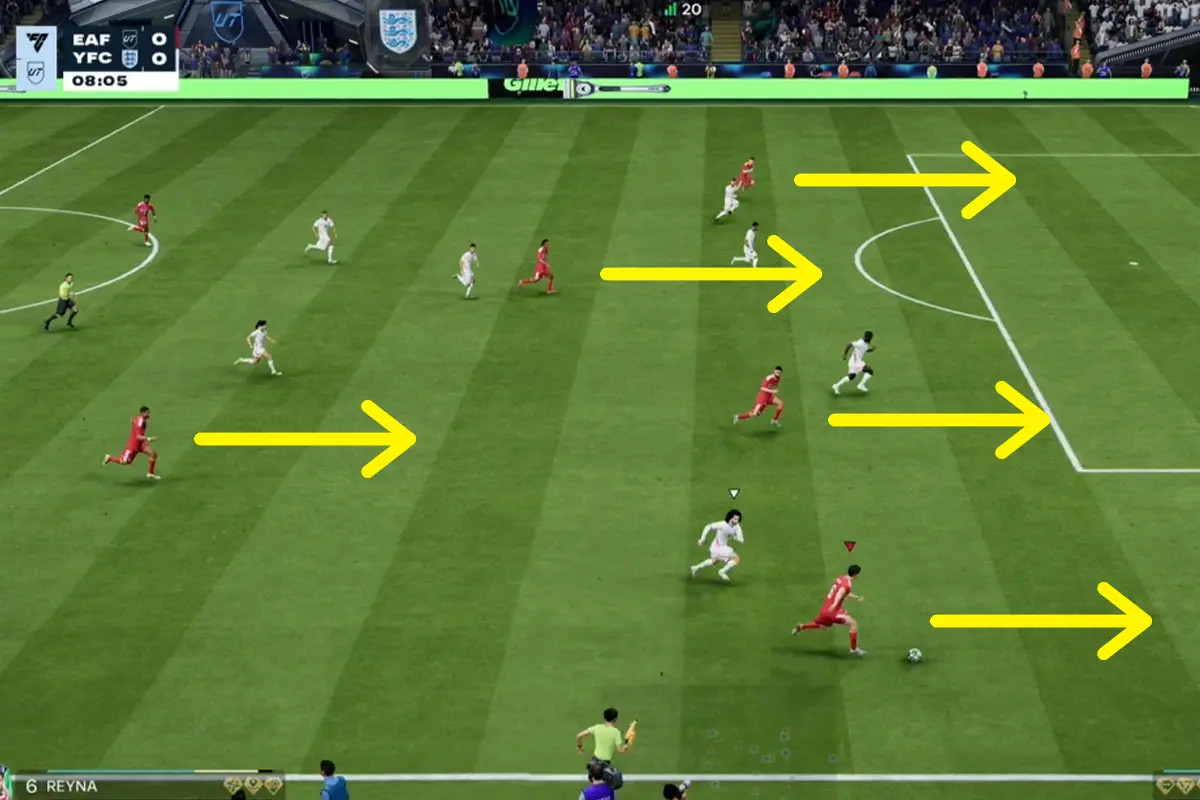
Most attacks begin patiently through the Deep-Lying Playmaker before moving quickly into the CAM. Once the Shadow Striker receives possession, the Advanced Forward's movement opens passing lanes while the Box-to-Box midfielder offers late support around the edge of the box.
Because the formation naturally creates triangles across the pitch, you'll usually have multiple passing options instead of relying on individual dribbling.
How This Formation Defends
The biggest defensive strength is its compactness.
With two central midfielders shielding the back four and disciplined fullbacks holding their positions, opponents often struggle to create clear chances through the middle. The Sweeper Keeper also provides reassurance against lofted through balls played over the top.
Patience is key. Rather than diving into tackles, allow the shape to force mistakes before committing to challenges.
Strengths
- Excellent balance between attack and defence.
- Strong central midfield control.
- Multiple passing options during build-up.
- CAM provides consistent goal threat.
- Difficult to break down when defending patiently.
Weaknesses
- Relies on an active CAM to connect play.
- Less effective if you prefer constant wing play.
- No CDM's to give that extra defensive cover
Common Mistakes
One of the biggest mistakes players make is forcing attacks too quickly. Allow the Deep-Lying Playmaker and CAM to recycle possession until the right opening appears.
Another common error is dragging the fullbacks out of position unnecessarily. Their defensive discipline is one of the biggest reasons this formation remains so difficult to break down.
💡 Pro Tip: If your CAM isn't getting on the ball enough, don't force passes into them. Build through your Deep-Lying Playmaker first, then use the Shadow Striker's movement to receive the ball facing goal.
Frequently Asked Questions
Is the 4-4-1-1 (2) good in FC 26?
Definitely. If you're looking for a formation that's competitive without being difficult to learn, this is one of the safest options right now.
Is this formation beginner friendly?
Yes. The balanced setup is forgiving and provides plenty of passing options, helping newer players keep possession without leaving themselves exposed.
Can I use this in FUT Champions?
Absolutely. Its compact defensive shape and versatile attacking options make it well suited to competitive matches against stronger opponents.
How To Build A Meta Squad For This Tactic
Once you've decided to use Cameron Rock's 4-4-1-1 (2), the next step is building a squad that fits the system.
Prioritise players that naturally suit each role. Even on a smaller budget, choosing players that fit the tactic usually has a bigger impact than simply buying the highest rated or most expensive cards.
You can use the EasySBC Squad Builder to help put together a squad around this setup and import the tactics code directly. The tactic can be imported by applying tactics code %Jo4UESWYs7P